文件上传至阿里云OSS
配置阿里云OSS
bucket设置
注册阿里云账号:阿里云权益中心_助力学生、开发者、企业用云快速上云-阿里云
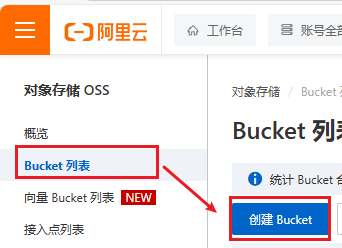
注册后进入OSS控制台:OSS管理控制台
创建bucket:
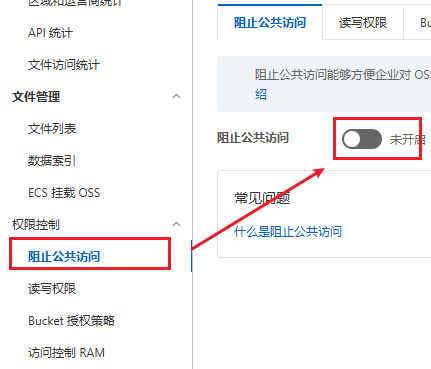
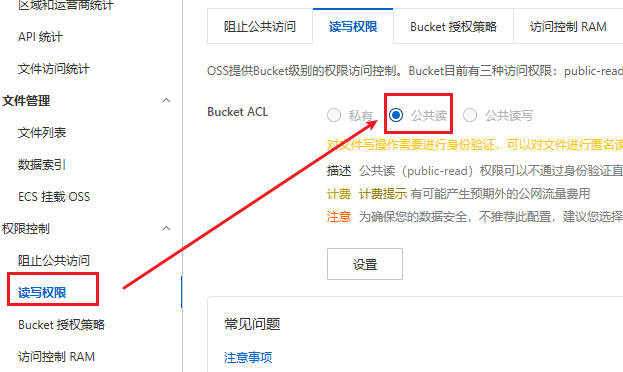
为了后续能访问到文件,需要修改bucket的访问权限
点击创建的bucket,如图修改权限
配置AccessKey
从右上角头像进入AccessKey管理页面

进入管理页面后点击“创建AccessKey”,完成校验后就会生成一组AccessKey ID和AccessKey Secret,保存好,AccessKey Secret只会出现这一次
然后以管理员身份打开cmd命令行,输入下方命令:
1
2
|
set OSS_ACCESS_KEY_ID=xxxxxxxxxxxxxxxxxxxxxxxxxxxx
set OSS_ACCESS_KEY_SECRET=xxxxxxxxxxxxxxxxxxxxxxxx
|
将上述的ACCESS_KEY_ID 与 ACCESS_KEY_SECRET 的值替换成自己的
然后再执行下方命令:
1
2
|
setx OSS_ACCESS_KEY_ID "%OSS_ACCESS_KEY_ID%"
setx OSS_ACCESS_KEY_SECRET "%OSS_ACCESS_KEY_SECRET%"
|
验证是否生效:
1
2
|
echo %OSS_ACCESS_KEY_ID%
echo %OSS_ACCESS_KEY_SECRET%
|
代码编写
一切以官网文档为准:OSS Java SDK V1_对象存储(OSS)-阿里云帮助中心
案例演示
0.前置条件:在项目中导入依赖
1
2
3
4
5
|
<dependency>
    <groupId>com.aliyun.oss</groupId>
    <artifactId>aliyun-sdk-oss</artifactId>
    <version>3.17.4</version>
</dependency>
|
如果使用的是Java 9及以上的版本,则需要添加以下JAXB相关依赖
 1
 2
 3
 4
 5
 6
 7
 8
 9
10
11
12
13
14
15
16
|
<dependency>
    <groupId>javax.xml.bind</groupId>
    <artifactId>jaxb-api</artifactId>
    <version>2.3.1</version>
</dependency>
<dependency>
    <groupId>javax.activation</groupId>
    <artifactId>activation</artifactId>
    <version>1.1.1</version>
</dependency>
<!-- no more than 2.3.3-->
<dependency>
    <groupId>org.glassfish.jaxb</groupId>
    <artifactId>jaxb-runtime</artifactId>
    <version>2.3.3</version>
</dependency>
|
1.编写属性类AliOssProperties:
 1
 2
 3
 4
 5
 6
 7
 8
 9
10
11
12
13
14
15
16
17
|
package com.yuanyu.properties;

import lombok.Data;
import org.springframework.boot.context.properties.ConfigurationProperties;
import org.springframework.stereotype.Component;

@Component
@ConfigurationProperties(prefix = "yuanyu.alioss")
@Data
public class AliOssProperties {

    private String endpoint;
    private String accessKeyId;
    private String accessKeySecret;
    private String bucketName;

}
|
2.在application.yml配置属性
1
2
3
4
5
6
7
|
yuanyu:
  alioss:
    # 阿里云oss配置
    endpoint: xxxxxxxx
    access-key-id: xxxxxxxx
    access-key-secret: xxxxxxxx
    bucket-name: xxxxxxxx
|
3.编写工具类AliOssUtil
 1
 2
 3
 4
 5
 6
 7
 8
 9
10
11
12
13
14
15
16
17
18
19
20
21
22
23
24
25
26
27
28
29
30
31
32
33
34
35
36
37
38
39
40
41
42
43
44
45
46
47
48
49
50
51
52
53
54
55
56
57
58
59
60
61
62
63
64
65
66
67
68
|
package com.yuanyu.utils;

import com.aliyun.oss.ClientException;
import com.aliyun.oss.OSS;
import com.aliyun.oss.OSSClientBuilder;
import com.aliyun.oss.OSSException;
import lombok.AllArgsConstructor;
import lombok.Data;
import lombok.extern.slf4j.Slf4j;
import java.io.ByteArrayInputStream;

@Data
@AllArgsConstructor
@Slf4j
public class AliOssUtil {

    private String endpoint;
    private String accessKeyId;
    private String accessKeySecret;
    private String bucketName;

    /**
     * 文件上传
     *
     * @param bytes
     * @param objectName
     * @return
     */
    public String upload(byte[] bytes, String objectName) {

        // 创建OSSClient实例。
        OSS ossClient = new OSSClientBuilder().build(endpoint, accessKeyId, accessKeySecret);

        try {
            // 创建PutObject请求。
            ossClient.putObject(bucketName, objectName, new ByteArrayInputStream(bytes));
        } catch (OSSException oe) {
            System.out.println("Caught an OSSException, which means your request made it to OSS, "
                    + "but was rejected with an error response for some reason.");
            System.out.println("Error Message:" + oe.getErrorMessage());
            System.out.println("Error Code:" + oe.getErrorCode());
            System.out.println("Request ID:" + oe.getRequestId());
            System.out.println("Host ID:" + oe.getHostId());
        } catch (ClientException ce) {
            System.out.println("Caught an ClientException, which means the client encountered "
                    + "a serious internal problem while trying to communicate with OSS, "
                    + "such as not being able to access the network.");
            System.out.println("Error Message:" + ce.getMessage());
        } finally {
            if (ossClient != null) {
                ossClient.shutdown();
            }
        }

        //文件访问路径规则 https://BucketName.Endpoint/ObjectName
        StringBuilder stringBuilder = new StringBuilder("https://");
        stringBuilder
                .append(bucketName)
                .append(".")
                .append(endpoint)
                .append("/")
                .append(objectName);

        log.info("文件上传到:{}", stringBuilder.toString());

        return stringBuilder.toString();
    }
}
|
4.编写配置类OssConfiguration,自动为工具类属性赋值
 1
 2
 3
 4
 5
 6
 7
 8
 9
10
11
12
13
14
15
16
17
18
19
20
21
22
23
24
25
|
package com.yuanyu.config;

import com.yuanyu.properties.AliOssProperties;
import com.yuanyu.utils.AliOssUtil;
import lombok.extern.slf4j.Slf4j;
import org.springframework.boot.autoconfigure.condition.ConditionalOnMissingBean;
import org.springframework.context.annotation.Bean;
import org.springframework.context.annotation.Configuration;

/**
 * 配置类,用于创建工具类AliOssUtil对象
 */
@Configuration
@Slf4j
public class OssConfiguration {
    @Bean // 项目启动时自动将方法的返回值作为Bean对象注册到Spring容器中
    @ConditionalOnMissingBean  // 当容器中没有指定类型的Bean时,创建该Bean
    public AliOssUtil aliOssUtil(AliOssProperties aliOssProperties) {
        log.info("创建阿里云文件上传工具类对象:{}", aliOssProperties);
        return new AliOssUtil(aliOssProperties.getEndpoint(),
                aliOssProperties.getAccessKeyId(),
                aliOssProperties.getAccessKeySecret(),
                aliOssProperties.getBucketName());
    }
}
|
5.编写控制层接口
 1
 2
 3
 4
 5
 6
 7
 8
 9
10
11
12
13
14
15
16
17
18
19
20
21
22
23
24
25
26
27
28
29
30
31
32
33
34
35
36
37
38
39
40
41
42
43
44
45
46
47
48
49
|
package com.yuanyu.controller;

import com.yuanyu.constant.MessageConstant;
import com.yuanyu.result.Result;
import com.yuanyu.utils.AliOssUtil;
import lombok.extern.slf4j.Slf4j;
import org.springframework.beans.factory.annotation.Autowired;
import org.springframework.web.bind.annotation.PostMapping;
import org.springframework.web.bind.annotation.RequestMapping;
import org.springframework.web.bind.annotation.RestController;
import org.springframework.web.multipart.MultipartFile;

import java.io.IOException;
import java.util.UUID;

/**
 * 通用接口
 */
@RestController
@RequestMapping
@Slf4j
public class CommonController {
    @Autowired
    private AliOssUtil aliOssUtil;

    /**
     * 文件上传
     * @param file
     * @return
     */
    @PostMapping("/upload")
    public Result<String> upload(MultipartFile file) {
        log.info("文件上传:{}", file);
        try {
            // 获取原始文件名
            String originalFilename = file.getOriginalFilename();
            // 获取文件后缀名
            String suffix = originalFilename.substring(originalFilename.lastIndexOf("."));
            // 使用UUID重新生成文件名,防止文件名重复造成文件覆盖
            String fileName = UUID.randomUUID().toString() + suffix;
            // 上传文件并获取文件访问路径
            String filePath = aliOssUtil.upload(file.getBytes(), fileName);
            return Result.success(filePath);
        } catch (IOException e) {
            log.error("文件删除失败:{}", e);
        }
        return Result.error("文件上传失败");
    }
}
|
其中Result为自定义的后端统一返回结果
 1
 2
 3
 4
 5
 6
 7
 8
 9
10
11
12
13
14
15
16
17
18
19
20
21
22
23
24
25
26
27
28
29
30
31
32
33
34
35
36
37
38
|
package com.yuanyu.result;

import lombok.Data;

import java.io.Serializable;

/**
 * 后端统一返回结果
 * @param <T>
 */
@Data
public class Result<T> implements Serializable {

    private Integer code; //编码:1成功,0和其它数字为失败
    private String msg; //错误信息
    private T data; //数据

    public static <T> Result<T> success() {
        Result<T> result = new Result<T>();
        result.code = 1;
        return result;
    }

    public static <T> Result<T> success(T object) {
        Result<T> result = new Result<T>();
        result.data = object;
        result.code = 1;
        return result;
    }

    public static <T> Result<T> error(String msg) {
        Result result = new Result();
        result.msg = msg;
        result.code = 0;
        return result;
    }

}
|
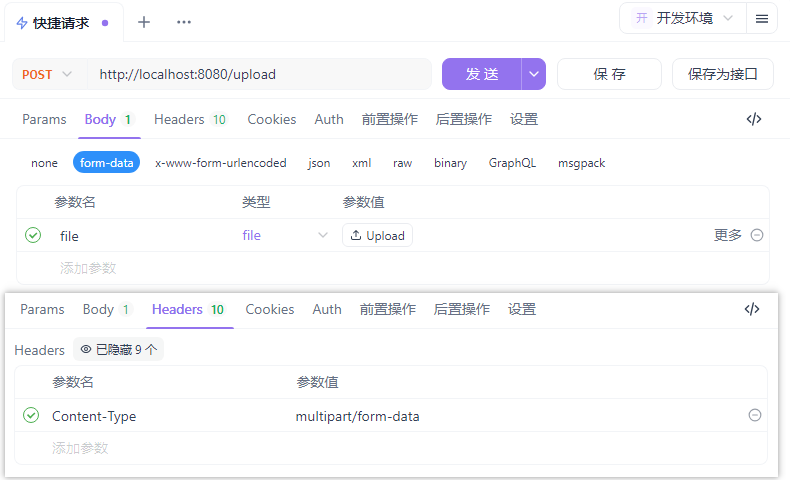
功能测试
现在就可以通过http://localhost:8080/upload接口上传文件到阿里云OSS了,接口会返回该文件的访问地址
使用接口测试工具测试功能是否正常(图中使用工具为ApiFox)